Best
clarinet cleaner
-
Overall: Keeping your clarinet and mouthpiece clean
-
Best Feature: A microfibre, very absorbent cleaner
-
TedScore™: 10/10
Best
cork grease
-
Overall: All tenon corks
-
Best Feature: Easy to use lipstick style cork grease
-
TedScore™: 8/10
Best
clarinet reed
-
Overall: All musicians from beginners to professionals.
-
Best Feature: A reliable, readily available reed.
-
TedScore™: 9/10
Assembling your clarinet is the first move to getting familiar with your new instrument and producing your initial sounds. This handy guide offers some top tips for properly and safely putting your clarinet together, ensuring that none of the keys or joints get damaged.
Make sure that you take your time putting your new clarinet back together. Rushing this job can put you at risk of bending keys or bashing joints that fit together well, potentially causing splits or chips to the body of the instrument. Slow and steady is best!
Clarinet Parts
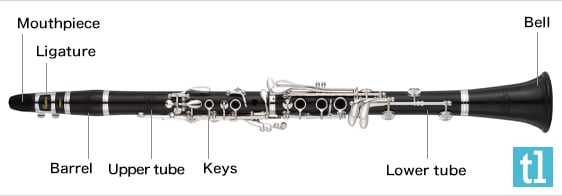
The clarinet is made up of an assembly of five main parts; the bell, the barrel, the upper and lower joints and the mouthpiece. Make sure that you know which is which before you start putting your clarinet together. Here is a very handy diagram to help identify each part.

The bell
The bell is the flared part at the bottom of the clarinet – it literally looks like a bell!
The lower joint stalk
The lower joint stalk connects the bell and the upper joint. It is controlled with your right hand and has the all-important thumb rest on the back. The clarinet rests on your right-hand thumb which takes the majority of the weight of the instrument.
This section of the clarinet has three open tone holes for your fingers and seven other keys which are controlled with the touch of your little fingers. Take a look at our Clarinet Fingering Chart here for more info on what the keys do.
The upper joint stalk
The upper joint stalk is the joint of the clarinet controlled with the left hand. Like the lower joint, the shape of it is flat and has three open tone holes at the front, the thumb hole and register key at the back and a selection of other keys to create lots of lovely notes!
The barrel
The barrel connects the upper joint and the mouthpiece. Again it is named because it is barrel-shaped!
The mouthpiece
The mouthpiece sits at the very top of the clarinet and is where the reed is attached. The reed is attached to the flat side of the mouthpiece using a ligature – usually made out of metal or leather.
Steps in Assembling Your Clarinet
Assembling a clarinet is a five-step process. It is best to start at the bottom and gradually work your way up to assemble the instrument. It is very important to take your time and be careful not to grip the joints too firmly so as not to cause any damage to the keys.
- First of all, make sure that you know which joint is which! The descriptions above and the Yamaha diagram will help you with this.
Start by attaching the bell onto the bottom of the lower joint stalk.
- Next, add the upper joint stalk. This step is the most delicate because of all the keys on the upper and lower joints. These can bend if you apply too much pressure so be careful! Make sure that you keep the keys lined up when you first put the upper and lower joints together. Press down the keys of the upper joint whilst gently pushing it onto the lower joint.
- Then carefully twist the lower joint round until the bridge key which links the two joints together (on the left-hand side of the clarinet) is lined up. This will make sure that the keywork works properly across the two joints.

- Next, add the barrel. The wider end of the barrel fits onto the top of the upper joint. Push the barrel all the way into the upper joint initially. You can adjust this as you tune up by pulling the barrel out a little bit.
- The last stage is to add the mouthpiece and reed. The mouthpiece will fit perfectly into the top of the barrel. You then add the reed (more on this below), and you can start making your first sounds!
To take apart your clarinet just reverse this process. Again, make sure that you take your time and don’t put too much pressure on the joints so that none of the keys gets loose, bent or broken. And ALWAYS make sure you take your reed off!
Line up the Bell, Joints & Barrel
The only two joints of the clarinet which HAVE to be lined up properly are the upper and lower joints. If these two joints aren’t aligned properly, then the keys won’t work. As mentioned above look out for the bridge key. This is made up of two pieces of metal which link the two joints together.
Press down the keys of the upper joint whilst you put these two pieces of the clarinet together and gently line up the linking key.
The bell, barrel and joints can be aligned so that the maker’s badge is all lined up. This is not essential, but it does look lovely!
Assembling the Mouthpiece & Reed
The last difficult step of putting your clarinet together is adding the mouthpiece and reed. It is best to put the reed on last so that it doesn’t shift as you try to slot the mouthpiece onto the top of the barrel.
Once the mouthpiece is added to the clarinet, you can add the reed. First of all wet the reed simply by putting it into your mouth. Make sure that you wet the whole reed, not just the tip.

Next, take the mouthpiece cap and ligature off the mouthpiece and put them to one side. Place the reed over the window in the mouthpiece and line the tip of the reed up with the top of the mouthpiece. Hold the reed in place with your thumb and carefully loop the ligature over the reed down to the lower part of the reed. Gently tighten up the screws of the ligature. Make sure that you don’t over-tighten the ligature screws; this can restrict the reed and make it a bit harder to play.
The most important thing to remember when handling your reed is that the tip of the reed is very thin, no matter the strength of the reed. Be careful not to knock it or bump it on your chair or music stand/clarinet case/clothing because this can cause cracks and chips.
Tips for Maintaining Your Clarinet After Use
Looking after your clarinet is really important. Proper maintenance will make sure that the instrument keeps working properly and lasts a long time. Trips to the repairer are sometimes inevitable throughout the lifespan of an instrument, but there are a few top tips that will make sure that you keep these to a minimum.
CLEAN AND DRY = A HAPPY CLARINET
The best thing that you can do to look after your clarinet is to keep the inside of your instrument clean and dry. Clean it out every time you play and don’t leave it to air dry. Use a pull-through style cleaner – a cloth with a weighted string. Simply drop the string and gently pull it through each section of the clarinet.
Keeping your clarinet clean and dry will ensure that none of the pads gets waterlogged and no moisture gets trapped in any of the holes.
GREASE YOUR CORKS!
When you put your clarinet together, you will notice that the ends of the upper joint and lower joint stalks and the mouthpiece are covered in cork. This cork holds the two sections of the clarinet together, creating an air-tight seal.
It is important to keep your corks greased – a bit like moisturising your skin! The cork grease keeps the cork soft and pliable. If the corks dry out they can crumble and fall off and will need to be replaced.
Lipstick-style cork grease is very easy to use – simply smear a thin layer onto the cork and rub it in with your fingers until you begin to feel the cork get a bit warm. This helps the grease sink in.
THE REED COMES OFF
Every time you finish playing – whether it is a quick 10-minute practice session, taking a lesson or a long concert is vital to take your reed off and clean out your mouthpiece.
When you play the clarinet your reed and the inside lining of the mouthpiece get wet. If you leave them in this state, they can get quite smelly – I’ve even seen a couple of mouldy reeds in my time working as a clarinet teacher!
Your reed will last much much longer and sound much much better if you allow it to dry out and keep it and the mouthpiece clean and hygienic!
Accessories for Clarinets
There are all sorts of accessories on the market for woodwind and clarinet players. In fact, there is a very useful Ted’s List article which highlights a few of the best ones! It is very easy to get a bit carried away with gadgets and gizmos.
There are five accessories which we consider essential for any clarinettist; these are a cleaner, a reed and reed case, cork grease and a music stand.

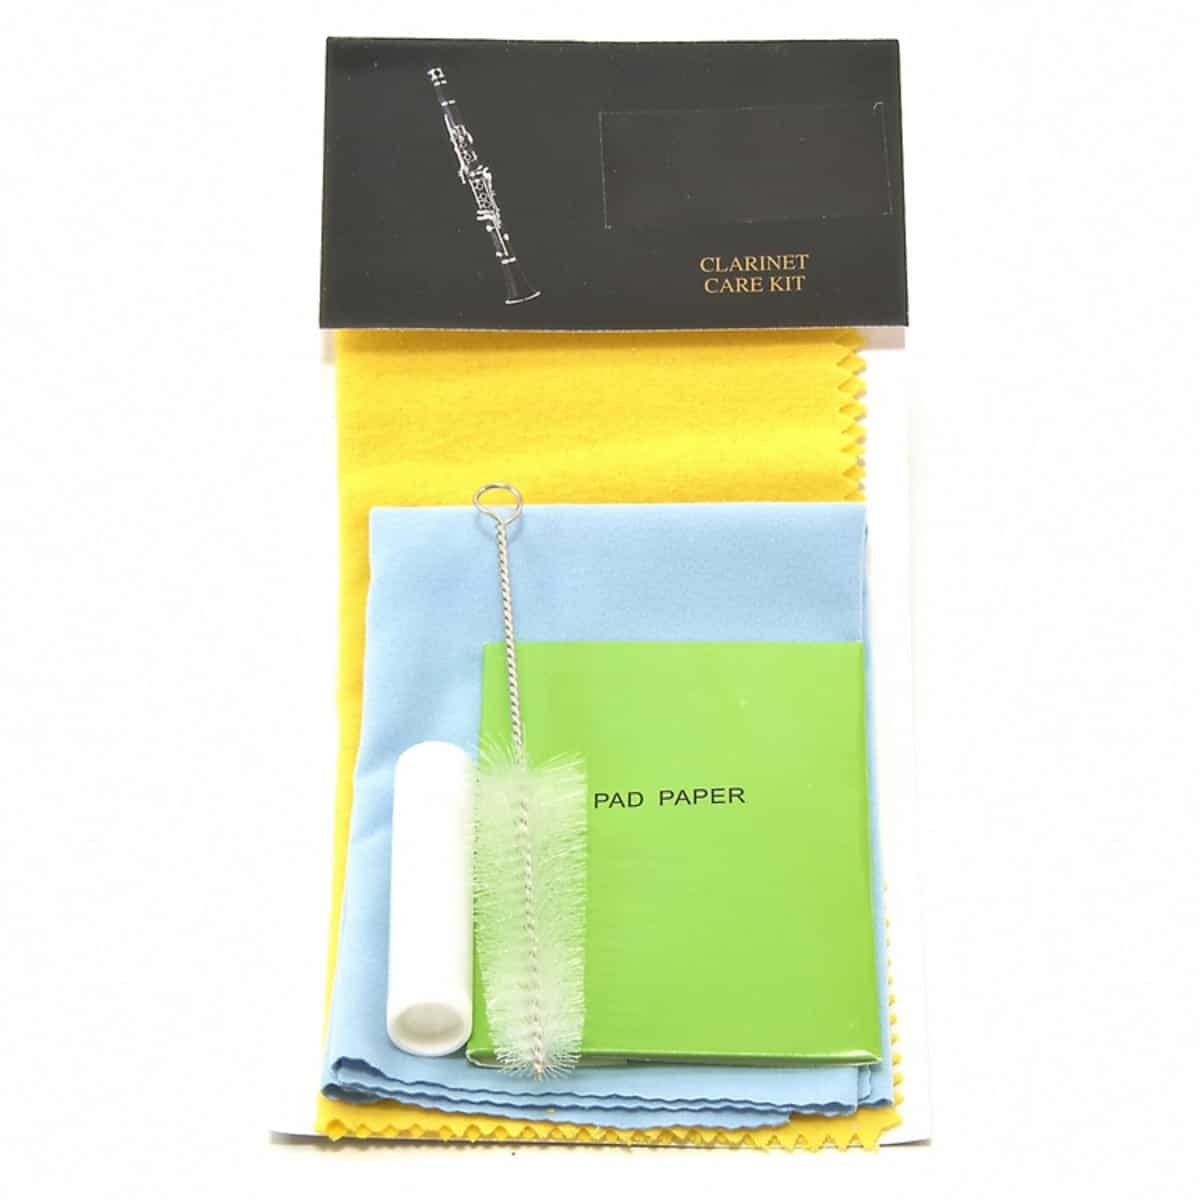
DESIGNED FOR: Keeping your clarinet and mouthpiece clean
FEATURES: includes everything you need to keep your instrument in top condition
OTHER INFO: Includes Cork Grease, Cloth and Brushes
Clarinet Maintenance Care Kit by Gear4music
When you check the price above, you’ll see there are loads of great places to buy this item. Our personal favorite is Gear4music.
It is the largest music retailer in the UK and fast becoming the most respected online music shop in the US too. Their customer service is excellent, they have competitive prices, really fast shipping, and usually have the longest guarantee.
Most professional musicians use Gear4music, so there is no reason why you shouldn’t too!
- Perfect for all clarinets
- None!
The professional musician who wrote this article combined many things,
from the product build, manufacturer’s reputation through to feedback
from other users, to create our famous TedScore™.

DESIGNED FOR: All musicians from beginners to professionals.
FEATURES: A reliable, readily available reed.
OTHER INFO: Comes in a range of strengths from 1 to 5
VANDOREN TRADITIONAL CLARINET REED
When you check the price above, you’ll see there are loads of great places to buy this item. Our personal favorite is Gear4music.
It is the largest music retailer in the UK and fast becoming the most respected online music shop in the US too. Their customer service is excellent, they have competitive prices, really fast shipping, and usually have the longest guarantee.
Most professional musicians use Gear4music, so there is no reason why you shouldn’t too!
- Available to buy in boxes of 3 and 10.
- Individually wrapped to protect the reeds from the elements.
- There are cheaper reeds on the market.
The professional musician who wrote this article combined many things,
from the product build, manufacturer’s reputation through to feedback
from other users, to create our famous TedScore™.

DESIGNED FOR: Keeping reeds safe and dry
FEATURES: Holds reeds in a variety of sizes - not just the clarinet.
OTHER INFO: Comes with a removable humidity pack to keep your reeds in a perfect atmosphere.
RICO MULTI-INSTRUMENT REED STORAGE CASE
When you check the price above, you’ll see there are loads of great places to buy this item. Our personal favorite is Gear4music.
It is the largest music retailer in the UK and fast becoming the most respected online music shop in the US too. Their customer service is excellent, they have competitive prices, really fast shipping, and usually have the longest guarantee.
Most professional musicians use Gear4music, so there is no reason why you shouldn’t too!
- Suitable for all single reeds of different sizes from Eb clarinet to Baritone saxophone.
- The removable humidity pack helps to prevent warping and reed damage.
- The humidity pack is a separate product and needs to be replaced every couple of months.
The professional musician who wrote this article combined many things,
from the product build, manufacturer’s reputation through to feedback
from other users, to create our famous TedScore™.

DESIGNED FOR: All tenon corks
FEATURES: Easy to use lipstick style cork grease
OTHER INFO: Readily available online and in most music shops
SUPERSLICK CORK GREASE
When you check the price above, you’ll see there are loads of great places to buy this item. Our personal favorite is Gear4music.
It is the largest music retailer in the UK and fast becoming the most respected online music shop in the US too. Their customer service is excellent, they have competitive prices, really fast shipping, and usually have the longest guarantee.
Most professional musicians use Gear4music, so there is no reason why you shouldn’t too!
- A cheap but excellent quality product
- Can be a bit sticky - make sure you wash your hands after using it!
The professional musician who wrote this article combined many things,
from the product build, manufacturer’s reputation through to feedback
from other users, to create our famous TedScore™.

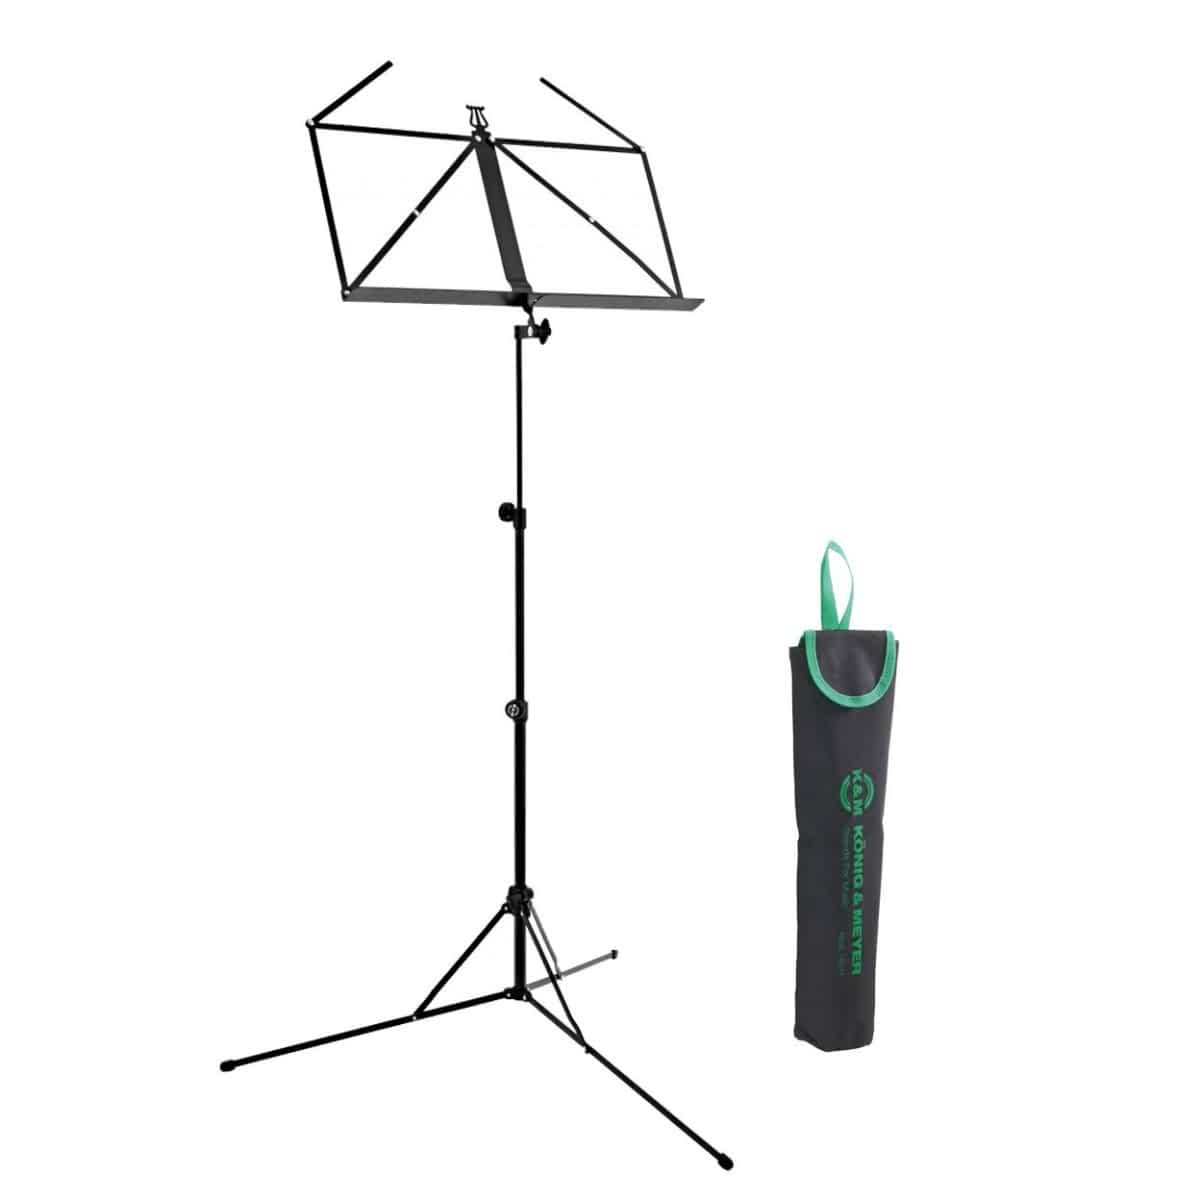
DESIGNED FOR: Everything! Lessons, rehearsals, practice and concerts!
FEATURES: A foldable stand provided with a handy carry case insert.
OTHER INFO: Adjustable height up to 1225mm
K&M 101 MUSIC STAND
When you check the price above, you’ll see there are loads of great places to buy this item. Our personal favorite is Gear4music.
It is the largest music retailer in the UK and fast becoming the most respected online music shop in the US too. Their customer service is excellent, they have competitive prices, really fast shipping, and usually have the longest guarantee.
Most professional musicians use Gear4music, so there is no reason why you shouldn’t too!
- Foldable and portable for the travelling musician
- Designed with a deep tray to hold music and small accessories, e.g. a pencil or spare reed.
- Sturdy, so a bit heavy
The professional musician who wrote this article combined many things,
from the product build, manufacturer’s reputation through to feedback
from other users, to create our famous TedScore™.
How To Put A Clarinet Together
Summary
We hope that you found this article helpful and now feel confident putting your clarinet together correctly.
Work from the bottom up and remember to take your time – slow and steady is the best way and will make sure that you don’t accidentally bend or break any of the keys.
If you’re looking for more accessories to buy for your instrument, we have a great article here that you might be interested in…
Good luck!
FAQ's
Start from the bottom and work upwards. Carefully attach the bell to the bottom of the lower joint stalk. Next add the upper joint stalk and line up the metal bar that bridges the two joints with keys on. Add the barrel onto the top of the upper joint, and the mouthpiece then fits into the top of the barrel completing the clarinet! Make sure that the ‘window’ of the mouthpiece, where the reed is attached, faces your body when you hold the clarinet – it should line up with the thumb rest. You then attach your reed and you are ready to play!
The mouthpiece goes at the very top of the clarinet. The mouthpiece slots easily into position on the barrel of the clarinet and then the reed is fixed to the mouthpiece using a ligature.
Technically you can keep your clarinet assembled, but ideally, it is best to only do this for short periods of time. Never leave your clarinet just lying around or balanced anywhere precariously, always use a clarinet stand to keep it safe.
If you are leaving your clarinet on its own for long periods of time, make sure that you clean it out and disassemble it and put it back in its case. This means that it makes sure that the clarinet stays safe, dry and in good working order.


Excellent article, Bethan. The breakdown of clarinet parts was super helpful for beginners. It might also be beneficial to include some common troubleshooting tips!
Regarding the section on clarinet accessories, I think it’s important to also discuss the impact of ligature on sound quality. In my experience, the material and tightness of the ligature can significantly affect tone and response. What are others’ thoughts on this?
how do u know if you put the reed on right? mine always sounds weird lol
It sounds like you might be placing it too high or too low. Make sure it’s aligned with the mouthpiece just right, not covering the mouthpiece opening fully and not too far below it.
Really appreciated the tips on maintaining the clarinet after use, especially about greasing the corks. It’s one of those small things easily overlooked but makes such a big difference. Anyone tried any specific brand they find works best for them?