how to play the Saxophone
What the heck is the next part of finding out how to have fun playing the Saxophone?
Hopefully, you’re excited that you have purchased your saxophone – but what’s next? Learning how to play the saxophone might be a great start… This part of our ‘Beginner’s Guide To Learning the Saxophone’ will start you off in the appropriate course.
How to assemble your instrument
Upon opening your case, you will see that the saxophone is essentially made up of 3 separate, key parts: the main body, the neck (or ‘crook’ to give it its more formal name) and the mouthpiece. PLUS the all-important neck strap – we emphasise the font purposefully here because this is where we would advise you to begin…..
Step 1: Place the neck strap around your neck (pretty obvious statement, we know!)
Step 2: Clip this onto the metal ring at the back of the main body of the sax:
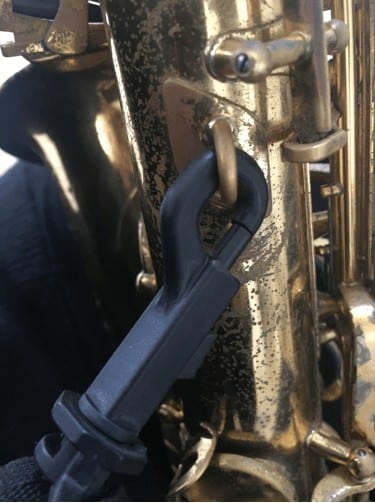
The reason we’d advise you to do this first, before putting all of the parts of the actual instrument together, is to avoid any potential mishaps involving the saxophone and the floor! All too frequently, beginners will misjudge the weight/ergonomics of holding the sax in one hand whilst fumbling about with clipping it onto their neck strap in the other…and you can imagine what can happen next (hint: it involves tears and shattered saxophone dreams!). So, let’s be sensible: strap, then sax! That way, the instrument is safely fastening to your body from the outset (phew!).
Step 3: Take the mouthpiece and gently twist onto the cork end of the neck of the saxophone.
Step 4: BEFORE attaching the neck/mouthpiece to the main body, focus on setting up the rest of the mouthpiece, i.e. reed and ligature. You will notice that the reed is perfectly shaped to align with the flat strip on the front of the mouthpiece; it has a thicker bottom and very thin, curved tip. You must always be very careful to treat this paper-thin tip of the reed with the utmost care, for two reasons: 1) if this is damaged, the sound produced will be compromised (if the tip is really ripped, you will struggle to make any sound at all), 2) reeds are not cheap (think £9 for a box of 3/£27 for 10)!!!
This next part is important – gently place the reed in your mouth to ‘wet’ it (imagine it is a lollipop if that imagery helps) – this might sound a little strange, but in order to produce sound efficiently (and limit the chances of unwanted ‘squeaking’ noises), the reed should by damp.
Now, position the moist reed so that the tip lines up perfectly with the top edge of the mouthpiece, whilst keeping this in place with your thumb, very gently place the ligature over the top; it will naturally sit on the barrel-shaped bottom half of the mouthpiece. Tighten the screws to keep your reed in position!
Cool fact: You’ll see from this picture that you can also find reeds made of plastic, something you might explore much further down the line. For now, we recommend you stick to those of the traditional cane variety…
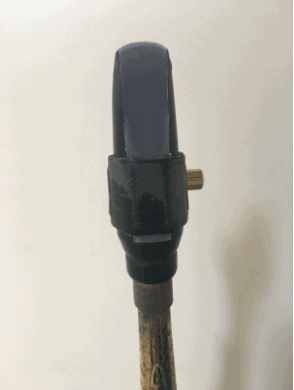
The reason we’d recommend keeping your neck separate to the main sax body whilst you fix your mouthpiece and associated paraphernalia is due to the clarity of vision. That is, once the acutely curved neck is attached to the main body, you will be dealing with your mouthpiece at an angle. For the inexperienced player, this can cause inaccurate alignment of reed with the mouthpiece (the nuances of reed position will be a conversation for a more advanced stage of learning), which, essentially, has the potential to compromise ease of playing and tone production.
Step 5: Now you can connect your neck/mouthpiece combo with the main sax body! To do this, gently twist back and forth as you do so until the neck slots in, being careful not to press down/bend the key work positioned on the neck (this is important, as the metal tends to be quite precariously soft here). Find the neck angle that feels comfortable to you and tighten the neck screws.
Hand Position
You’re now assembled and ready to go – but which hand goes where?! You will see that the saxophone is perfectly designed so that your hands will only sit one way (so you cannot go wrong!): left-hand covers the top of the instrument and right hand, the bottom. If you look at the back of the sax, there are two key points which are anchors for your thumbs.
On the top half, you will have a big black or gold, raised disc – this is where your left-hand thumb sits. If you look down, towards the bottom of the sax, there will be a big black or gold curved piece – hook your right thumb underneath this.
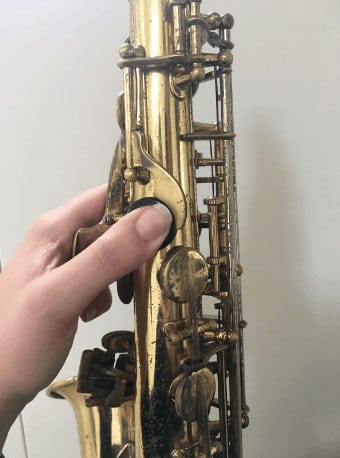
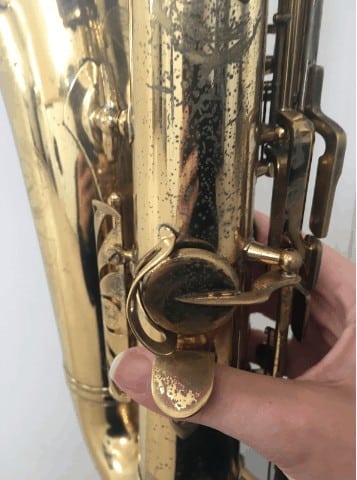
Your thumbs will only rarely leave these spots (on specific occasions when you become a little more advanced), so for now, imagine they are glued there.
You don’t need to press any keys on the front of the saxophone at the moment, just get used to these thumb positions and relax your other fingers. NB. Make sure that your neck strap is taking the weight of the instrument, not your right hand!
Mouth position: ‘Embouchure’
We are gearing ever closer towards your first note! The next part is crucial…what should you do with your mouth/the mouthpiece? Firstly, you will see/hear very early on that mouth position is referred to by its more formal term of ‘embouchure’, so we will adopt this hereon in to give you plenty of practice.
Step 1: place your top teeth gently on top of the mouthpiece, about a ⅓ of the way down
Step 2: gently position your bottom lip over your bottom teeth (this forms a natural cushion. You don’t want the teeth to ever touch the reed)
Step 3: Now gently close the sides of the mouth around the mouthpiece so that you have essentially greeted a sealed vacuum…you don’t want any air to escape, but on the flip side, neither do you want to ‘bite’ the mouthpiece.
Breathing
This might seem like an unimportant talking point given that this is an involuntary action and the basics of human bodily function! However, there is a danger that the saxophone beginner may feel light-headed if not conducted properly, so it is worth a moment of our time.
Essentially, you want to avoid shallow, chesty breaths. Instead, imagine that your stomach is a balloon that you want to fill up with air; this picture will help to encourage deep, supported breath intake.
As you direct this air into the instrument, try not to puff your cheeks (this is common amongst beginners, but is a habit that will have to be undone further down the line), instead, imagine you are sending the airstream through a directed funnel.
A heads up: you may find that you struggle to produce any/much sound in your first lesson. Do not be disheartened! This is common, and is not representative of your future potential! Keep trying and you’ll get there.
Your First Notes
Congratulations! If you have just managed to produce a sound, with no keys pressed (just your thumbs in the correct position), then you have played a ‘C sharp’ – or C# – which is positioned in the middle of the musical stave when printed on paper. We’ve recommended you start here because this is simplest, given the lack of ‘fingering’ pattern required. However, beginner courses/books/lessons traditionally start with notes B, A, G, which we will run through now:
How to play a ‘B’:
Having thus far pretty much ignored the position of the fingers in both hands (thumbs aside), we will now introduce their general positioning. Looking at the front of the saxophone, at the key-board, you will see that there are 3 big round keys (usually pearly white in appearance) situated at both the top and bottom of the instrument, respectively. These correspond to your index, second and third fingers.
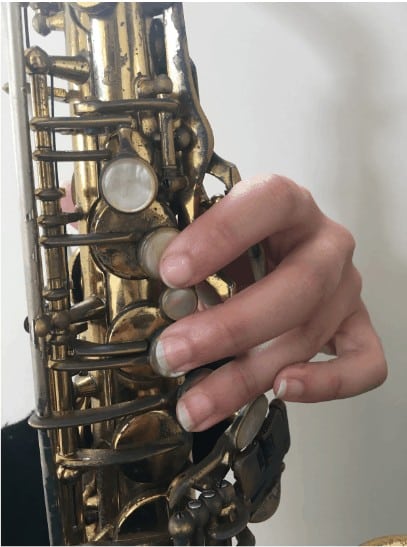
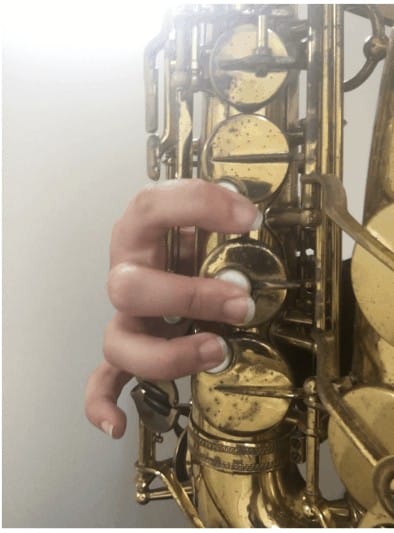
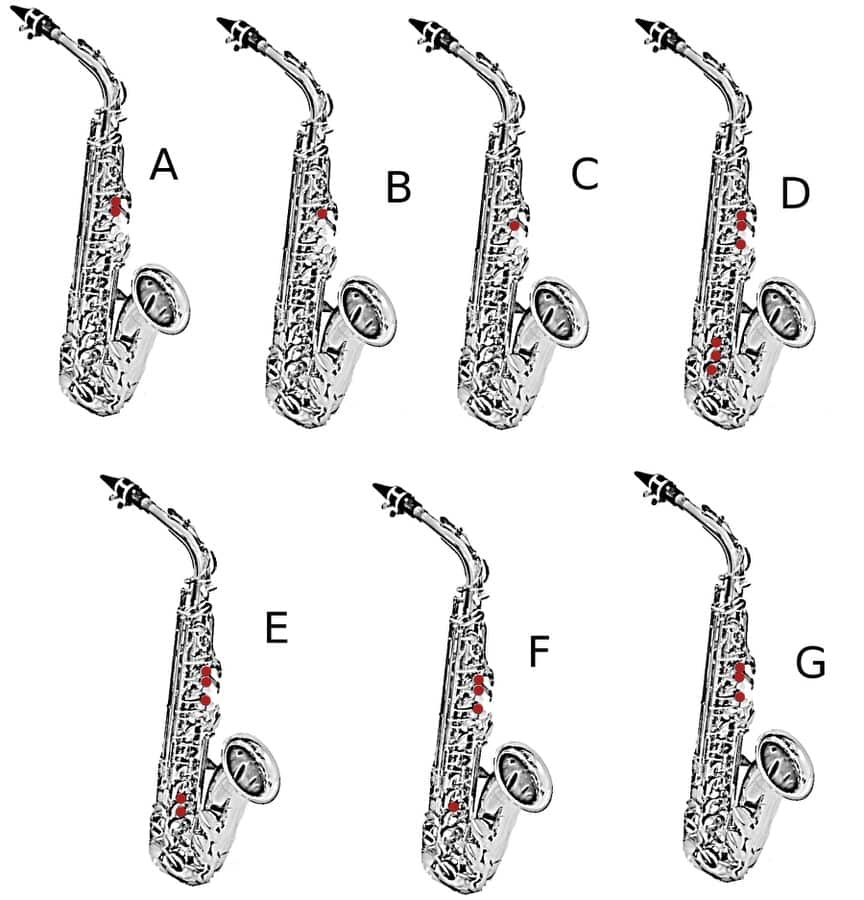
To play the note ‘B’, simply press down your left-hand index finger. Make sure your embouchure is formed correctly and you’ve taken a nice, supported, deep breath, releasing this down the instrument, to produce a sound.
How to play an ‘A’:
To play the note ‘A’, keep you index finger left hand down as for ‘B’, adding your second finger of the same hand.
How to play a ‘G’:
To play the note ‘G’, keep your two fingers down as for note ‘A’, adding your third finger of the same hand.
Here is what the notes look like written on the stave, accompanied by a graphic finger chart:
How To Play the Saxophone - Summary
By now, you should be able to:
- Assemble your saxophone
- Position your (wet!) reed properly on the mouthpiece
- Form correct hand position
- Understand how to form your embouchure
- Make sure you are thinking about how to breathe effectively
- Produce a note
- Understand the fingering patterns for notes B, A, G
- Know what these three notes look like on the musical stave
Now it’s time to improve your technique…
About the Author
Robert Emery
Robert Emery is Founder & CEO of Ted's List. He has performed all around the world as a conductor and pianist. From Sydney Opera House to the Royal Albert Hall, Robert has enjoyed bouncing around on stage in most of the major venues in the world. As a record producer, he has worked on fifteen No 1 albums, and hopes he can get to sixteen asap!
The Times called him 'the eccentric barefooted maestro' and the Mail quoted that 'the assured baton was controlled by the rather energetic and brilliant conductor'.
Robert has a wife (Mrs. E), two children (Master T and Master A) and four cats (Merlin, Mulberry, Partridge & Penguin). Between performing, producing, composing and running Ted's List, he runs an entertainment business called The Arts Group, comprising of a symphony orchestra, choir, live event production house, digital TV company and artist agency. Any spare time is usually devoted to sleep.
Other posts by this author
Every Friday, I Deliver This Special Email…
Are you missing out? Most people get swamped with email messages, but I can promise there is one you’ll not want to miss; our 4 Feature Friday email.
At the end of each week, I’ll send an e-mail with all of the awesome surprises I’ve uncovered.
Music and songs. Music artists. Gizmos. Instruments.
To be able to tour the world means I’ve experienced things I’d never imagine. And that’s what I’d like to share with you. So just click below to get entry right now.
Read the next post in this series:


