how to play the Oboe
So you want to read more about the Oboe for beginners?
Learning the oboe might seem like tackling a huge mountain. Part of our Beginner’s Guide to Learning the Oboe series, this piece helps you kick off your oboe adventure by laying down the basics you need to get started.

The Oboe
The oboe is part of the woodwind family of the orchestra (along with the flute, clarinet and bassoon) and is related to the recorder family. This means that they all function in a similar way: essentially they all need air to flow down/across a reed/mouthpiece, causing vibration and then through a conical or cylindrical tube to make a sound. The different pitches are created by pressing keys which cover holes down the tube; in general, the more holes covered means the lower the pitch.
The oboe is a treble instrument, meaning it plays relatively high but not as high as the flute. It also looks very similar to the clarinet and is often mistaken for one. But the two sound very different. The unique feature of the oboe is its double reed which helps to give it such a pure distinctive sound.

The Reed
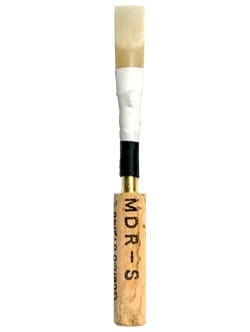
The reed is made of bamboo cane, which has been dried, cut, gouged, shaped, folded over, tied onto a staple (metal tube with cork cushioning) and then scraped down to make it into something which will squeak when blown down. It is the air moving down between the double reed that makes the vibration. It is such an important part of the whole instrument and the most fragile, so take care when handling reeds, as a damaged corner or a crack can make it unplayable!
Always soak the tip of the reed in water first. Use a small clean pot and put about 1cm of water in, then sit the reed in with the tip down for about a minute or two before starting to play. The cane will vibrate more easily and you’ll have more control over it when it’s been soaked.
Setting up
Whilst the reed is soaking, you can put the oboe together. There are 3 sections: the top joint, the middle joint and the bell. First pick up the middle joint in your left hand and the bell in your right. Holding both firmly, but without squeezing too much, twist the two parts together gently so that the cork section of the middle joint fits into the socket of the bell. Be sure to twist the bell away from you as you line them up so that the interlocking keywork doesn’t catch, and instead connects up into a straight line. If this feels too stiff, you can use cork grease.
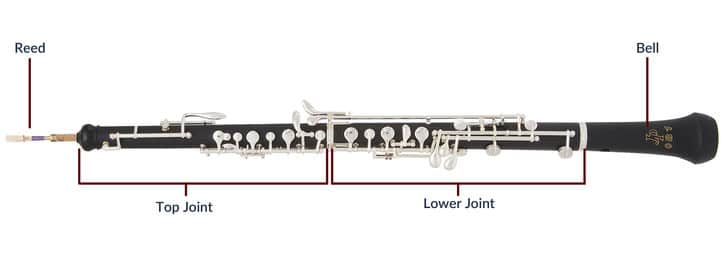
Then hold all of that in your right hand and pick up the top joint in your left. This time connect them using small twists. There’s a lot more keywork on these joints so you can’t do 360-degree rotations. Again use cork grease to help if necessary. Along each side of the oboe, you’ll see long rods of metal; you want these to line up from the top to the middle joint. And on the front of the oboe, there’s a little interlocking section of keywork too. Use these to guide you to the correct final position. Be mindful of the feather keys (the ones that stick out to the sides of the oboe). Be careful not to grip them when assembling the oboe, and not to rest the oboe on them when you put it down.
Embouchure
Now we can warm up the reed. Put the oboe safely flat across your lap or on a flat table, always making sure the keys face upwards to prevent damage.
Holding the reed upside down from the cork, shake the water out, and blow/suck out any excess. Now, remember how fragile these are, so it’s helpful to think of your lips being like cushions to protect it from your teeth. We’ll also use the lip muscles all around the reed to help control it as we play. To form the perfect oboe embouchure (lip position) drop your jaw slightly open, fold both lips in and over your teeth, rest the reed in the centre of your lower lip, close your mouth, use the muscles above, below and on both sides of your mouth to form a cushion all around the reed. Imagine you’re making a sideways oval shape.
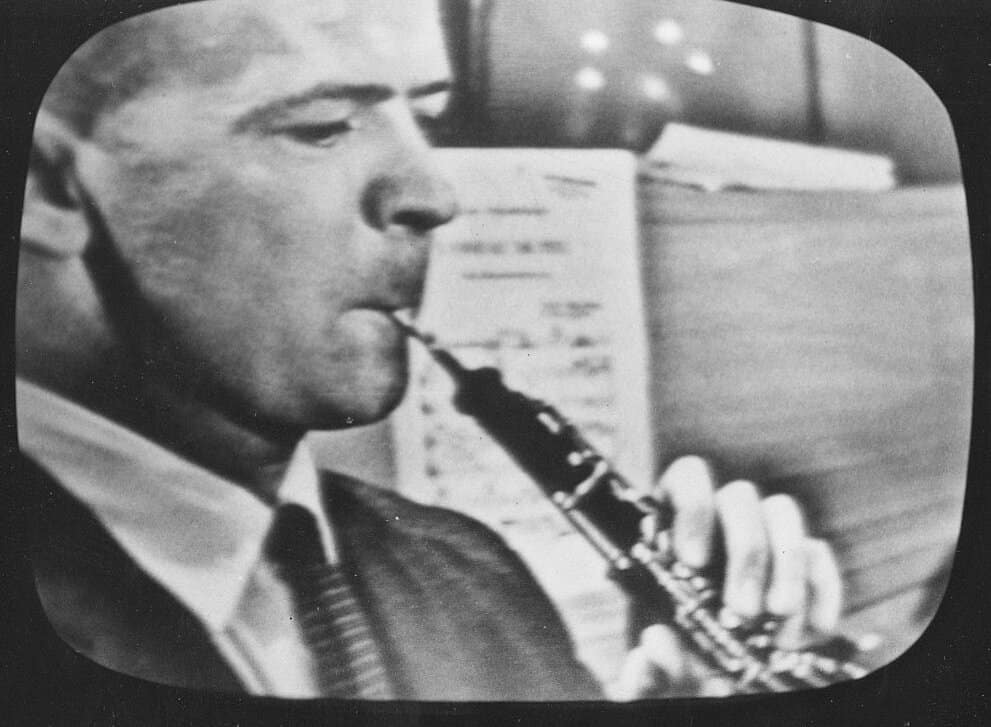
Look in a mirror to check your embouchure. Ideally, you want to aim for your folded lips to look like a straight line, with minimal or no pink from your lips showing. You may get nice dimples where the muscles at the sides of your mouth are working!
Check that you’re not smiling and that your jaw has not moved further back or forward than is normal for you. You should have about half of the cane part of the reed in your mouth, but not so far that your lips touch the wire.
Now (whilst still holding the reed with one hand for support), blow air quite fast down the reed, as if you’re blowing down a straw. Hopefully, you’ll feel the reed vibrate and a squeak will come out! It is likely to feel very ticklish at first but this will soon go as you get used to it. Try sustaining some longer squeaks now.
If the reed is not making a sound and you can’t see any visible damage, it could be that the reed is either too open or too closed for you. Temperature and humidity can affect the cane in this way. Most reeds will have wire on the lower part of the cane for you to make adjustments. Gently squeeze the wire on the sides to open up the reed, or squeeze the flatter sides to close it down. As a guide, you’ll need an opening of around 0.5-1.0mm as you look down the reed. Only squeeze the reed when it’s been soaked, never when dry as it can break.
If it still feels too tough to make a noise, the reed is probably too thick for you and will need scraping (made thinner using a reed knife) by your teacher, or maybe it’s just a bad reed! Always have a few reeds in your reed box and in general go for thinner/lighter reeds to ensure comfort when playing. Sometimes a reed works better one way round compared to the other, so you can draw a mark on the cork as a reminder.
Everyone has different lips, mouths, and therefore different preferences, so it’s worth trying a few options to find what’s best for you. And remember these are made from a natural material, so they will never be identical (unfortunately!) and they won’t last forever. If you look after them, keep them undamaged, clean and safe in their case between playing, they should last you several months.
Once you’ve managed a few long squeaks on the reed, put it into the top of the oboe. It should fit fairly snugly, but if it’s too big or too tight to fit in, you can file the cork down a little with an emery board or use cork grease. Straighten it so that it is flat in line with the main keywork.
Holding the oboe
Now, what about hand positions?
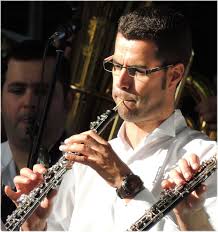
You’ll see on the back of the middle joint there is a thumb rest sticking out. This is where your right-hand goes, so all the weight of the oboe will be on your right thumb. The left-hand controls the top joint keys (just like on the recorder and the other woodwind instruments). Basically, all your fingers will sit on the largest and flattest of the keys, which are positioned with fairly equal spacing between them so it should line up with where your fingers naturally want to land anyway. You’ll notice that your little fingers will each have a few feather keys (the ones sticking out to the sides) to control. Your left thumb also has two or even three keys to use but put it on the large round key for now. This is called the Thumb Plate (N/A for Conservatoire Oboes).
Let your elbows float a little away from your sides so that your wrists are straight and your fingers can move as easily as possible. Now carefully put the reed in your mouth as you did for the squeaking earlier. Be mindful to lift the oboe to you, don’t tilt your head down to meet the oboe. The whole oboe should be roughly at a 45-degree angle now, although depending on your bite and therefore the natural angle of the reed in your mouth, you may prefer to hold the oboe slightly higher or lower.
Now blow a fast stream of air through the reed and down the oboe. Hopefully, you made a noise!!
Playing a note
The first note a teacher or book will show you is B, in the middle of the treble clef. For this, you just use your left thumb on the Thumb Plate (or no key for Conservatoire Oboes, the thumb is just on the wood at the back) and the first finger of your left hand (L1) on the first round key. It feels like you’re pinching the oboe with your left hand. Your right hand is just supporting the weight of the oboe on your thumb, with all your other fingers hovering closely above the other keys. Have a go at playing a B!
I’d recommend using a beginner book to guide you through the note learning as it’ll include diagrams of the finger positions for each note and where it is on the stave. But just for fun, try the B again and then go ahead and add the next finger in the left hand (L1 + 2) to play an A. Then the next (L1, 2 + 3) to play a G. And then if you want, continue down with the right-hand fingers (R1, 2, 3) too. The notes will keep stepping down in pitch getting lower as you cover more holes, sending the air further down the oboe.
Sound production is the most challenging part of learning the oboe. Just making the reed squeak and then producing a sound on the instrument is a big achievement. Now just aim for playing long sustained notes, keeping the air stream constant and focussed, as if it were a laser beam of sound!
Breath control
All wind instruments require a huge amount of breath control, and so you’ll learn how to breathe more deeply than your everyday breathing, and use a much greater capacity of your lungs. You’ll also get used to taking quicker deeper breaths in and then long sustained breaths out as you play. Often with the oboe, you’ll need to empty your lungs and refill in very short gaps between phrases in order to stay oxygenated.
Deep breathing exercise
To understand deep breathing, put your hands on your middle so you can feel your rib cage. Take a slow deep breath into the bottom of your lungs so that, as they inflate, your fingers move apart a little bit. You can also try this with your hands on your sides and then reach round to your back where you’ll feel your ribs do the same thing. Then blow out, contracting your lungs, squeezing the air out and your fingers will close again. This is how wind players use their maximum lung capacity when playing. Oboists are especially good at playing very long phrases seemingly effortlessly all in just one breath.
Self checking
When practising the oboe, it’s worth looking in the mirror often to check that your lips haven’t unrolled, that your posture hasn’t collapsed, and that your shoulders don’t lift up when you breathe in. How are your lips feeling? They will get tired quickly at first, so be patient with yourself as your strength and stamina improve. Just be mindful that you’re not squeezing or biting. Remember to think of them as firm cushions.
Articulation
As well as coordinating the air and fingers, we also use the tongue to articulate the different notes. Try saying ‘Tuuuuu tuuuuu tuuuuu’. That’s the same action for the oboe. Instead of the tip of your tongue touching the roof of your mouth behind your teeth though, it’ll touch the underside tip of the reed inside your mouth.
Try this just on the reed first – aim for a long squeak with added ‘Tuuuuu tuuuuu tuuuuu’. Keep blowing the air continuously whilst you add the tonguing. You don’t need separate breaths for separate notes.
Now on the oboe, on a B. Then try other notes and change between them, saying ‘Tuuuuu’ at the start of each note.
So the magic combo for playing the oboe is Air, Lips, Fingers, and Tongue.
Packing away
At the end of each practice session, put the reed away carefully back in its box, gently twist each section of the oboe apart and clean it. Mops (pipe cleaner style with wooden handles) are good especially for younger players as the silk pull-throughs have a tendency to get knotted up and stuck in the top joint!! Keep the oboe away in its case when not being used, on a flat surface, somewhere safe from being knocked, and at a fairly constant temperature. Never leave it near a radiator as the wood can crack!
And finally……
You may have heard that the oboe is regarded as one of the most difficult of all the orchestral instruments to master. This is mainly due to the actual sound production being such a challenge compared to other instruments. I wouldn’t let this put you off. Learning an instrument can be one of the most rewarding things you’ll ever do, and every instrument comes with its own challenges. I believe it’s about finding the right one for you because if you like it, you’ll enjoy playing and working to get better, and with each challenge, you overcome you’ll get a huge sense of satisfaction.
The oboe has a unique sound, a quirky character, capable of hauntingly beautiful melodies, and as a rare breed, it stands out. So if that sounds right for you, go for it – you won’t regret it!!
How To Play the Oboe - Summary
By now, you should be able to:
- Put the oboe together and soak the reed.
- Produce a long even squeak on the reed with the correct embouchure.
- Hold the oboe correctly and know the fingerings for at least B, A and G.
- Breathe in deeply and produce a long even note.
- Add articulation using the tongue.
Now it’s time to improve your technique…
About the Author
Katie Bennington
Katie Bennington enjoys a varied freelance career playing regularly with orchestras around the country such as the London Symphony Orchestra, Royal Philharmonic Orchestra, Aurora Orchestra, ENO, ENB, and CBSO. She is also a keen chamber musician and enjoys working in collaboration with artists from different genres.
She is a Masters graduate of the Guildhall School of Music and Drama where she studied oboe with Richard Simpson, Gordon Hunt and David Walter, and cor anglais with Jane Marshall. She then went on to take part in the LPO's Foyle Future Firsts Scheme and in 2010 was a member of Southbank Sinfonia. She was a British Double Reed Society prize winner at the Barbirolli International Oboe Festival and Competition in 2009. At GSMD she was a Needlemaker’s Woodwind Prize Finalist in 2008, and in Dec 2007 she won the Slaughter and May Musician of the Year Award. She plays on a Sound Alchemy Enigma oboe and a Loree Royal cor anglais.
Other posts by this author
She is a Masters graduate of the Guildhall School of Music and Drama where she studied oboe with Richard Simpson, Gordon Hunt and David Walter, and cor anglais with Jane Marshall. She then went on to take part in the LPO's Foyle Future Firsts Scheme and in 2010 was a member of Southbank Sinfonia. She was a British Double Reed Society prize winner at the Barbirolli International Oboe Festival and Competition in 2009. At GSMD she was a Needlemaker’s Woodwind Prize Finalist in 2008, and in Dec 2007 she won the Slaughter and May Musician of the Year Award. She plays on a Sound Alchemy Enigma oboe and a Loree Royal cor anglais.
Books, Cool gadgets & Gizmos
Are you currently missing out? Many of us get flooded with messages, however, I can guarantee there is one you’ll not want to overlook; our 4 Feature Friday email.
At the end of each week, I’ll deliver an e-mail with all of the great surprises I’ve found.
It could literally be about anything at all regarding music. It’ll land in the e-mail if I believe you’ll like it!
Touring the earth being a music performer means I get to experience stuff you wouldn’t believe, and sharing it with you makes a fabulous ending to your week. Register free of charge beneath.
Read the next post in this series:


